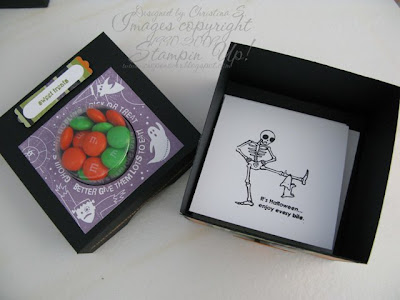
 When I was making my projects for what used to be Product of the Month, I made these 2 little goodies using Stampin' Up!'s Sweet Center stamp set and the sweet treat cups. These really are very cute and I already have some ideas for what I can do for goodie bags for my boys' preschool halloween party. I only used M&M's in these because that's all I had on hand, but any tiny candy can work too, like skittles!
My first project was the goodie bag. The actual bag was cut from my Cricut using the Plantin Schoolbook cartridge.

- After cutting the bag, but before putting it together, I stamped the verse and the swirls, from Tasty Sweet with Old Olive and Pumpkin Pie ink.
- I then cut the circle out with the 1 3/4" circle punch.
- The stem for the pumpkin was made using the ornament hanger stamp from the Sweet Centers set. Since I don't have all the markers, I used Crushed Curry to outline the stamp (minus the wire hanger part). Once I stamped it on whisper white, I then colored the rest in with Crushed Curry marker, and then colored on top of that with Bermuda Bay marker. I used the Soft Suede marker to make some lines on it to resemble a stem. I then glued that above the cut out circle, and then using the Soft Suede marker, I colored the wire hanging part of the same ornament stamp (from Sweet Centers) and stamped that next to the stem.
- The pumpkin face, from Autumn Harvest, was stamped on the sweet treat cup using black Staz On
- I then filled the cup, put a backing on it and then put it into place through the cut out circle.
- I then assembled the bag, and closed it off with basic black and old olive ribbon.
Products:
Paper: Whisper White cardstock (SU)
Ink: Old Olive classic (SU), Pumpkin Pie classic (SU), Staz On black (SU)
Stamp Sets: Autumn Harvest, Tasty Sweet, Sweet Centers
Other: sweet treat cups (SU), Cricut, Plantin Schoolbook cartridge, sticky strip
This next project is a 3x3 box, which I cut and assembled myself and it also shows the chalkboard technique. Right now it is holding some small little cards, but can hold treats or anything!
In the future I will try to do a tutorial on the box and the technique! They both are really easy to do!
After the box is cut to size, scored, and the right pieces are cut don't assemble it until all the other pieces are put together. I used Designer Series Paper for the sides of the box, and the yum.yum.yum, etc... on the top sides are done using the chalkboard technique using Whisper White craft ink and pumpkin pie Stampin' pastels.
The cards for the inside are very simple and is just made using whisper white cardstock, cut into 3"x6", scored at 3" to make a 3" square card.
Products (all are Stampin' Up!):
Paper: black cardstock, pumpkin pie cardtock, whisper white cardstock, Cast-a-Spell Designer Series Paper
Ink: perfect plum classic, old olive classic, basic black classic, whisper white craft
Stamp Sets: Sweet Centers, Batty for You, Teeny Tiny Wishes, Tasty Sweet
Other: sweet treat cups, stampin' pastels (pumpkin pie), word window punch, modern label punch, sticky strip
I'm sorry for the horrible instructions. I am trying to get by on about 3 hours of sleep since my sons have been sick and I don't think my brain is fully functioning!! And now since my husband just got home from work I am going to go lay down! :)


This is just the cutest thing ever!! Puts all my sweet treat cards to shame! Can I come over and play!! So darling!!
ReplyDelete