Monday, September 28, 2009

Baby card

Today I am going to show a baby card I made for my friend who just had a baby girl!  The Cricut Cartridge Spotlight is postponed until tomorrow since I got a little behind because of the weekend I had.


This was actually really fun for me to make since this was the first girlie thing I got to create!!  I have 2 boys, the boys cousins are boys and my friend's other child is a boy!  Lots of testosterone around here!


All products are Stampin' Up!
Dimensions: cut at 5.5x8.5, scored at 4.25; top layer (pink) is 5.25x4
Paper: whisper white cardstock, pretty in pink cardstock, melon mambo cardstock
Ink: Staz On black, pretty in pink classic, melon mambo classic
Stamps: Fun & Fast Notes, Priceless
Other: melon mambo stampin' write marker, melon mambo .5" grosgrain ribbon, 1.25" square punch, scallop border punch, dimensionals

1. cut and score main card base
2. cut pink top layer and use scallop border punch on the bottom
3. stamped stroller image on whisper white with StazOn and colored it in with marker; stamped flowers on whisper white with classic ink
4. cut the stroller out to size of the image, punch out the flowers with the square punch
5. adhere those images on top of melon mambo cardstock - 1/8" border on all sides
6. used dimensionals to adhere the images to the pink cardstock
7. tie the ribbon around the pink layer cardstock (used the fake bow method for this one)
8. adhere the pink layer on top of the whisper white base
9. stamp the sentiment on the bottom below the scallop border

I'm also pretty excited because I am making her a first year scrapbook and I can't tell you how nice it is to work with other "girly" colors!  My pink papers are finally getting used!

Friday, September 25, 2009

Friday Favorites: Becky Higgins sketches

In honor of Becky Higgins resignation from Creating Keepsakes, I figured my love for her sketches would be perfect for my Friday Favorites.

Before I begin, though, I want to apologize for any blurry pictures!  We just got back from apple picking and I wanted to quickly get the pictures and in my laziness I didn't go back to redo blurry pictures!


I loves sketches, all kinds, but these are the ones that introduced me into the sketch world.  It seems that finding the perfect picture placement for my pictures has always been the hardest part for me, so having a blueprint made things go so much faster for me!

After a while it seemed that I had collected so many of Becky's sketches, plus her 2 sketch books (at the time) and I was getting tired of always pulling everything out each time.  So I came up with a way to put it all together and it made it so much easier for me to browse the sketches without having a whole bunch of different books.

I decided I would take all her sketches and put them in one big binder.  I started with the monthly ones from the magazine.  I took the sketch and the layout examples and put them in page protectors and then into the binder.  I did these for all the ones I had when I had my subscription to CK magazine.

When I no longer subscribed, I would get the sketches from online on the website.


 I put the sketch and the examples layouts on a sheet and then print out each month, hole punches the sheets and put them in the binder with the others.

The next part was a little traumatizing, but after I did it, I felt it was worth it.


 I ended up taking apart the idea books so I would be able to put that into my binder


I did it for both the books...


Now I had all her sketches and all examples in one place.  All I have to do is pull out one binder instead of a bunch of magazines, 2 books, and some print outs from the computer.

The only one I don't have in the binder is the Best of Becky Higgins Sketches - her latest sketch book.  I like the way the book is set up and I didn't want to take it apart.  But there is something I did do in this book...


I know the pictures is blurry, but down at the bottom of the page I wrote where the sketch came from.  So if it was from the magazine I wrote the month and year.  If it was from one of the books, I wrote which book and the page number.  This way I can reference the sketch in my binder.

I thought I would also show some scrapbook pages I did using the sketches as inspiration.  Most of the times I start with a sketch and I modify it some way to fit the pictures I have, but sometimes I do my own page almost the same placement as the sketch...it really depends.  Oh, and let me apologize again for the pictures taken right from my album.  Again, laziness!  I just wanted to get the pictures and didn't want to pull each one out of my album and then have to put them back in.  Also, I was trying to get some of the 2 page layouts side by side and I can't seem to get it to work, so I'm sorry that they're not next to each other!


Title: cricut cartridge - Storybook, Patterned Paper: Basic Grey (I think...I can't remember!)


Those are just a few pages I have made using sketches.  I just love how it makes things so much faster for me when trying to design a page, especially for the part I seem to struggle with the most - picture placement.


Tuesday, September 22, 2009

Thank you card

I wanted to play with my Stampin' Around wheel and create something with it, so I came up with this thank you card


The whole thing was fairly simple and using the wheels with the ink cartridge for backgrounds is very neat!
1. cut and scored the very vanilla cardstock
2. wheeled on the background using the chocolate chip cartridge for the wheel
3. stamped "thank you" with chocolate chip ink on very vanilla
4. cut out "thank you" with circle punch
5. used designer label punch to punch out chocolate chip paper
6. used horizontal slot punch to put "slots" on each side of designer label
7. mounted thank you circle with dimensionals on the designer label
8. added the ribbon through the slots - it's attached to the back of the label, where it is then attached to the card.  On the inside of the card, I just taped the ribbon underneath to the cardstock so it wouldn't slip


Dimensions: 8.5"x11" cardstock, cut at 4.25"x11", scored at 5.5"
Paper: very vanilla cardstock (SU), chocolate chip cardstock (SU)
Ink: chocolate chip classic (SU)
Stamps: Baroque border wheel, Teeny Tiny Wishes
Other: 1" circle punch, designer label punch, horizontal slot punch, dusty durango 1/2" grosgrain ribbon, dimensionals

Monday, September 21, 2009

Spotlight: Plantin Schoolbook - End Caps

This was supposed to be shown at the beginning of the month, so I am way behind on my Cricut Cartridge Spotlight.  I am going to try my best to still show everything I was going to show, but I did get a bit behind with everything that has been going on.  Just a recap, each month I am going to feature a different Cricut Cartridge and every Monday I will show some projects I did with that particular cartridge.

I know end caps are a bit confusing, so I thought I would show some of the things I made using this particular feature.  I also tried to put together a tutorial (in pictures), and I will try my best to get that up one day.

First, I made a little sheet that shows all the shape end caps.  Most of these I cut at the size of 1 1/4"  It is amazing to see the size differences depending on which shape you choose.  Having these little sheets help to see which ones will end up being larger.  One thing to keep in mind is that the size you choose is the size of the letters that are cut out in the middle, and not the shapes at the end.  So for my examples here, the 1 1/4" size is for the "hi"


The first real project I really had in mind for end caps was to make license plates for both my sons' bikes.  They have the same bike, and even though they know which one is theirs, I don't!  I also wanted to make it a little personal to them.


Brandon's favorite color is red and Connor's favorite color is purple.  The black layer is the main one you cut out first, with the letters cut in the middle.  For these, I chose 1" for the letters.  Once I cut both of the black layers, I put the red and purple paper through and did the end cap shadow.  This layer goes behind the black, and the color shows through where the letters cut out of the black.  I then cut the regular star shape to layer on top, and I cut this at 1 1/2"  To get the right size for this was trial and error to see which size worked best.  Next I want to laminate them and then attach it to their bikes.


My next project was a bookmark, although I forgot to put the ribbon on this before I took the picture! 


I once again cut the main layer in black, and for the shadow I used paper that I made using distress inks.  The colors are Shabby Shutters and Worn Lipstick.  I rubbed the 2 colors of ink on my non stick craft sheet and the spritzed it with water.  I then took my plain white cardstock and put it down on top of the colors.  I also cut out an extra shadow layer to put on the back so it didn't have a plain white back.

This next project was really my test pieces that I was playing around with, but I think I am definitely going to use them for something for my boys!


Main layer was cut with white paper and then shadowed with black.  I can't remember what size I made this, though.

I know end caps can be a bit confusing when you are trying them for the first time, but after you do it a couple of times the directions start to click.  Even now, though, I can still get confused.  I don't know how well my tutorial pictures came out, but I will try to get them on my computer and post that tutorial some time this week.

Saturday, September 19, 2009

Friday Favorites...on Saturday!

Ok, I know I am a day late for my Friday Favorites.  This has been a crazy month anyway, and none of my plans have gone off as I had wanted.  Yesterday was a busy day and I was just so tired by the time I got home that I forgot to post.  Anyway, for my first Friday Favorites it actually doesn't even have anything to do with papercrafting.  That's mainly because I didn't have anything ready ;)  So I thought I would share with you my most favoritest thing ever, yes even before scrapbooking...


These 2 little boys are my sons and they are most favoritest (it can be a word in my world!) ever!  As an an added bonus, this is one of my most favorite pictures of the 2 of them together, which can be a nearly impossible mission to accomplish.   It wasn't even a picture that we were planning.  I was trying to get a picture of them together as well as a family picture.  Most of the time things weren't going great and I was about to settle for photoshopping all of us in a picture together!  But during one of the "breaks" the boys were playing together and giggling and we made a joke to them to hug each other and they did!  We quickly snapped the picture!  From there we were actually able to get a nice family picture and even a picture of me and my husband together.  I turned all 3 pictures into black and white, framed them, and they are hanging in my living room.  I smile every time I see this picture.  I hope that they will always remain best friends as they grow up.

Thursday, September 17, 2009

Counting down to Disney!!

Woohoo!!  It's that time!


We are at our 30 day countdown to our trip to Disney World!  This time we are going to celebrate my sons' 5th birthday.  I can't wait!  My mom and dad are coming as well, which makes this trip pretty special.  I feel I am super lucky to be able to have divorced parents who can still be friends and go on vacation together to celebrate their grandchildren's birthday.  Anyway, onto the calendar...

This is another hybrid calendar made with digital paper, photoshop, and my Cricut!

 
First I worked on the calendar part using digital paper from Digital Design Essentials.  I darkened the background, and lightened the paper for the circles.  I then used the Mickey font and the Disney World font for the letters and numbers.  The size of this portion is 8x8, which is then matted on white, then matted on black.  Once this was done and printed and matted, I worked on the Cricut portion.

I used the Mickey & Friends cartridge for the heart with the Disney, the gloves (border option), and for Mickey and Pluto.  "Countdown" was using the Disney World  font and "to" was using the Mickey font and I just printed that out and cut it by hand.

For the Disney heart, I used the same digital paper I used as the calendar background.  I just printed a patch of the digital paper on regular paper and then cut it with the Cricut.

 
I also cut out little Mickey heads from the cartridge and this is what my boys will put on the dates as we countdown to when we leave.  Every night before we go up to bed, they each take turns and stick one of the heads on that days date.  We even have a special place in our kitchen where I put the countdown calendars, and when I went to put this one up they went right to it and told me where to put it.  The whole thing is mounted on 12x12 paper.


I can't believe my boys are going to be 5 years old!!  I can't believe we will be able to celebrate their birthday (hopefully, if all goes well) in Disney World!  I am really looking forward to this, but I am trying not to show too much excitement because I am always afraid that once I do, the thing I am excited about won't happen!!  So for now I will cross my fingers and hope for the best and maybe pretty soon we will be in the happiest place on earth! :)

Tuesday, September 15, 2009

Sweet Treats

When I was making my projects for what used to be Product of the Month, I made these 2 little goodies using Stampin' Up!'s Sweet Center stamp set and the sweet treat cups.  These really are very cute and I already have some ideas for what I can do for goodie bags for my boys' preschool halloween party.  I only used M&M's in these because that's all I had on hand, but any tiny candy can work too, like skittles!
My first project was the goodie bag.  The actual bag was cut from my Cricut using the Plantin Schoolbook cartridge.  


  • After cutting the bag, but before putting it together, I stamped the verse and the swirls, from Tasty Sweet with Old Olive and Pumpkin Pie ink.
  • I then cut the circle out with the 1 3/4" circle punch.
  • The stem for the pumpkin was made using the ornament hanger stamp from the Sweet Centers set.  Since I don't have all the markers, I used Crushed Curry to outline the stamp (minus the wire hanger part).  Once I stamped it on whisper white, I then colored the rest in with Crushed Curry marker, and then colored on top of that with Bermuda Bay marker.  I used the Soft Suede marker to make some lines on it to resemble a stem.  I then glued that above the cut out circle, and then using the Soft Suede marker, I colored the wire hanging part of the same ornament stamp (from Sweet Centers) and stamped that next to the stem.
  • The pumpkin face, from Autumn Harvest, was stamped on the sweet treat cup using black Staz On
  • I then filled the cup, put a backing on it and then put it into place through the cut out circle.
  • I then assembled the bag, and closed it off with basic black and old olive ribbon.
One thing to note is that this is top heavy and when it's not filled, it will fall over.  Once it has stuff in it, however, it should be fine.

Products:
Paper: Whisper White cardstock (SU)
Ink: Old Olive classic (SU), Pumpkin Pie classic (SU), Staz On black (SU)
Stamp Sets: Autumn Harvest, Tasty Sweet, Sweet Centers
Other: sweet treat cups (SU), Cricut, Plantin Schoolbook cartridge, sticky strip

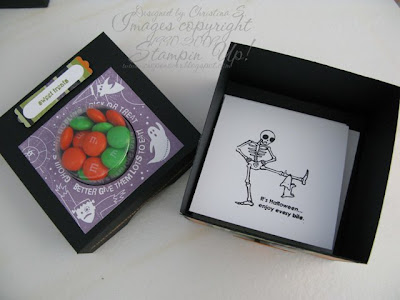
This next project is a 3x3 box, which I cut and assembled myself and it also shows the chalkboard technique. Right now it is holding some small little cards, but can hold treats or anything!


In the future I will try to do a tutorial on the box and the technique!  They both are really easy to do!


After the box is cut to size, scored, and the right pieces are cut don't assemble it until all the other pieces are put together.  I used Designer Series Paper for the sides of the box, and the yum.yum.yum, etc... on the top sides are done using the chalkboard technique using Whisper White craft ink and pumpkin pie Stampin' pastels.


The cards for the inside are very simple and is just made using whisper white cardstock, cut into 3"x6", scored at 3" to make a 3" square card.

Products (all are Stampin' Up!):
Paper: black cardstock, pumpkin pie cardtock, whisper white cardstock, Cast-a-Spell Designer Series Paper
Ink: perfect plum classic, old olive classic, basic black classic, whisper white craft
Stamp Sets: Sweet Centers, Batty for You, Teeny Tiny Wishes, Tasty Sweet
Other: sweet treat cups, stampin' pastels (pumpkin pie), word window punch, modern label punch, sticky strip

I'm sorry for the horrible instructions.  I am trying to get by on about 3 hours of sleep since my sons have been sick and I don't think my brain is fully functioning!!  And now since my husband just got home from work I am going to go lay down! :)

Sunday, September 13, 2009

I'm Back!

Good grief, it feels like forever! Trying to get into a new routine threw me for a loop. My boys started preschool 3 days a week, and my one son has to go for speech therapy once a week (for now). So I kinda lost track of time!

On top of the new schedule, I have been thinking a lot. I realize I am a scrapbooker first and foremost. I recently got into cardmaking and other paper crafts, but my first love belongs to scrapbooking. I love looking back at my pictures and reliving those memories. I also believe that the bad comes along with the good and scrapbooking is a kind of therapy for me. I have been through some struggles (infertility is a biggie!) and those are a part of my life and my memories and by scrapbooking some of them it helped to release some of those emotions that have been inside. Now that I have gotten into cardmaking, I find that it's so much fun to be able to create something in a short amount of time and design things I normally wouldn't for a scrapbook page. With that said, I am an equal opportunity scrapper...there are jut so many great products out there to be limited. I think that everything compliments each other and things can work well together even if they aren't from the same company. Please note that these are just MY feelings, and not everyone has to feel the same way.

I was really starting to enjoy my blog and the ideas that I had and I really don't want to give that up, along with my freedom to use whatever products I feel work best for my layout or card. I started another blog just in case I needed it, but I don't think I am going to use it. It just gets too complicated! So I hope whoever was reading before please sticks around because I will be starting to post my ideas, including the Cricut cartridge spotlight. I am just going to go back and tweak some things. I will also still be using Stampin' Up! stuff because, well, I have it now! lol...and because their products are really good. I love their 8.5x11 cardstock and their inks and I love that everything matches. I love their punches and the fact that they coordinate with some of the stamps. I still have projects and cards I made that I would like to show. So I just won't be selling, but I will be using. But I really needed my Basic Grey fix, especially with their new lines coming out!! Oh, and all the new Cricut cartridges...I really want From My Kitchen!

I would still like to keep my Cricut cartridge spotlight and my Friday Favorites, but I need to think about my Product of the Month and what to turn that into. I would also love to offer stamping tutorials like I was going to do, but now it just opens me up to more possibilities.

Now I have to get back to my poor, sick children who have only been in school for 3 days and they are already sick. Yuck!

Tuesday, September 1, 2009

September Announcement

Happy September everyone! Here we are at the start of a new month, and I am at the start of the new things I have planned for my blog! So as I stated previously, each month I am going to offer a couple of different things to look forward to and on the first of the month I will announce what those are. So without further ado...

For the month of September:

Cricut cartridge spotlight: Plantin Schoolbook
Every Monday during the month I will show different ideas and projects I made using the Plantin Schoolbook cartridge. The first spotlight will be on Sept. 7th.

Also on the agenda is Friday Favorites! Every Friday I will share one of my favorite things. It may be craft related, but sometimes it may not be. I guess it really depends on what my favorites are at the moment! I will begin my Friday Favorites this Friday, Sept. 4th.

Well, there you have it! I really hope you enjoy everything I have planned, as I am super excited to get started.
Blog Widget by LinkWithin